


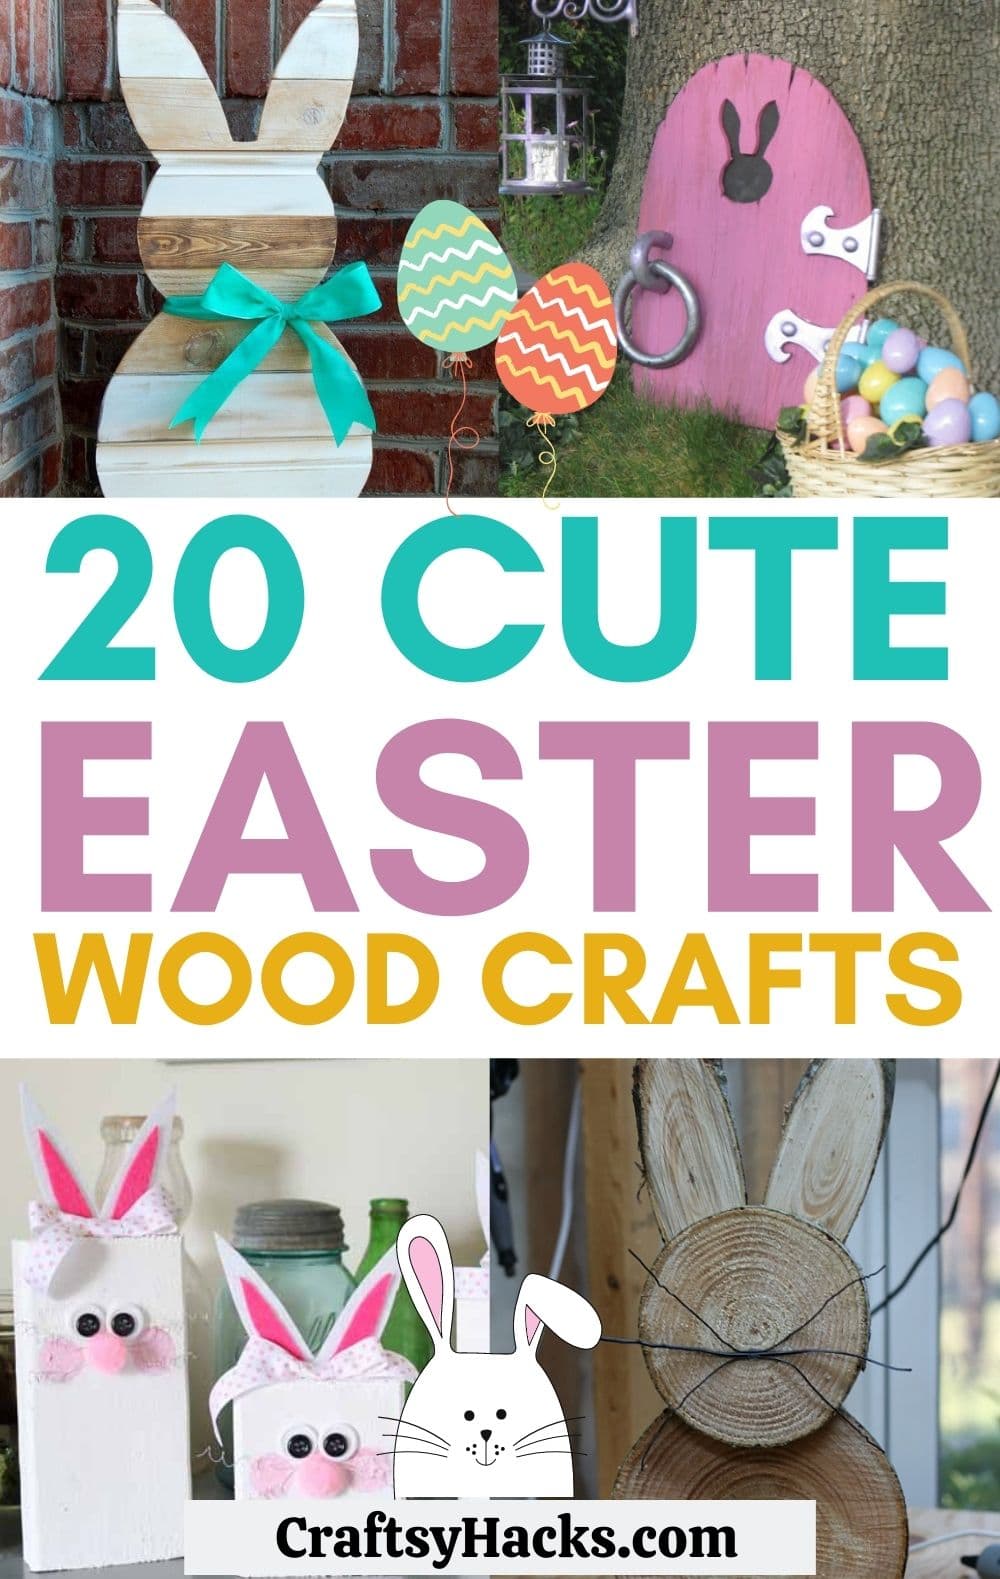
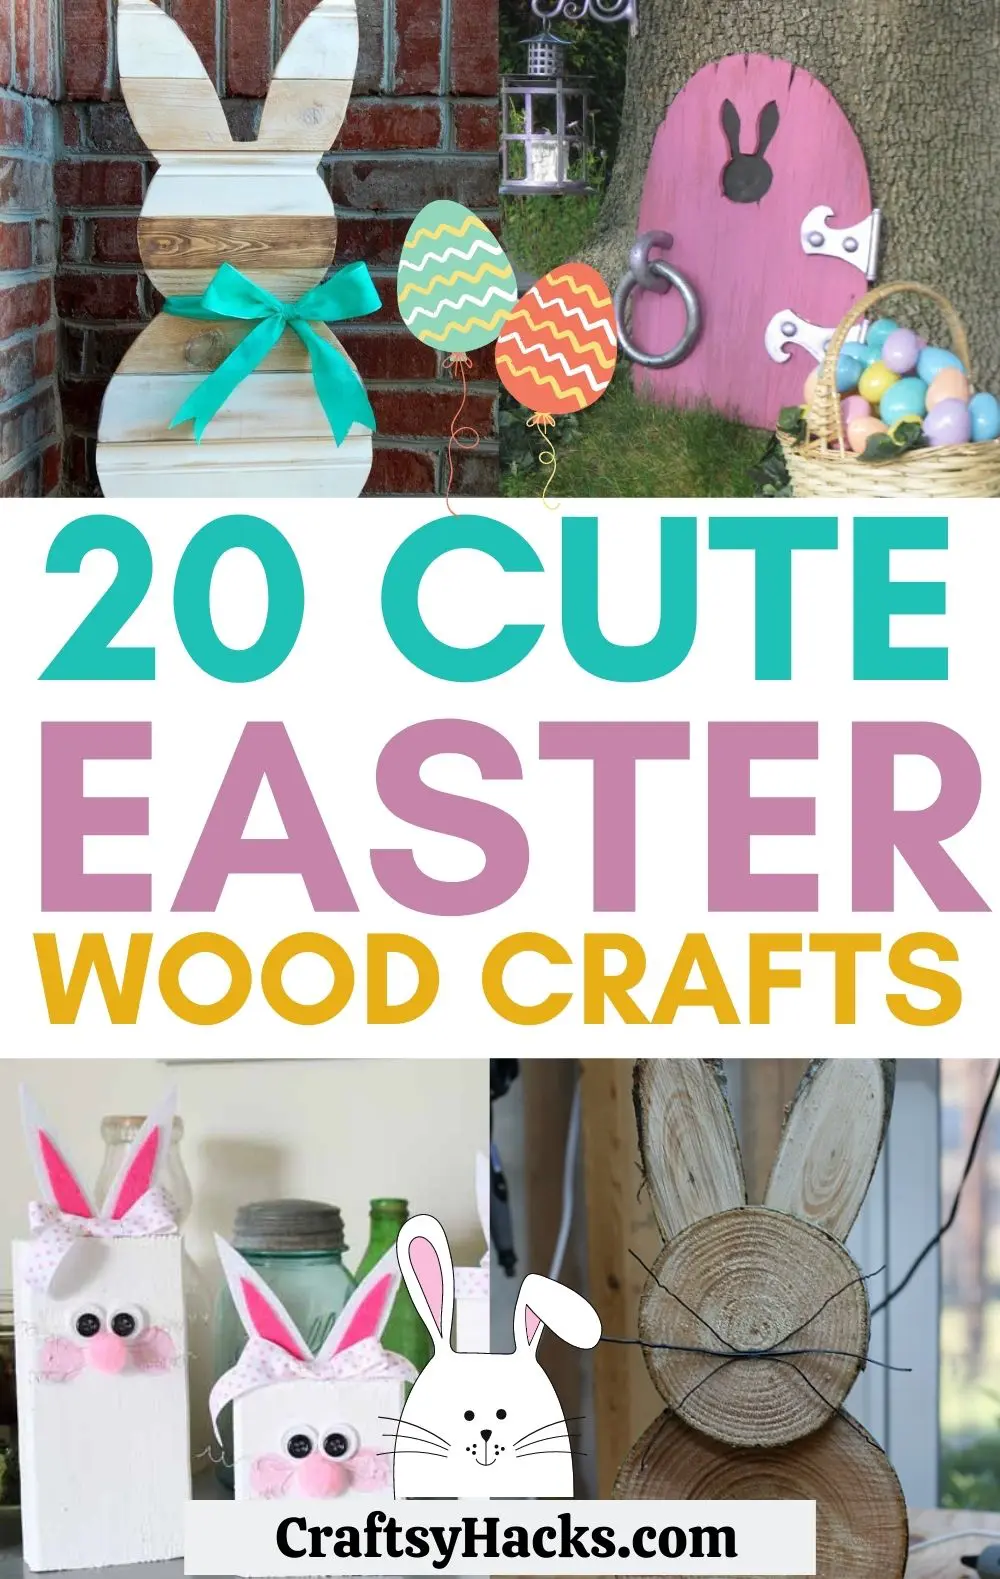
Got some wood laying around? Get crafty this Easter with these Easter wood crafts. Cute, fun to make, and great for home decor.
Whether you’re a beginner woodworker or an experienced craftsperson, I think we can all agree that wood is one of the most beautiful crafting mediums. It’s solid, versatile, and connected to nature.
So, it only makes sense that Easter decorations are made from wood. It is a holiday celebrating the rebirth into a new season. Spring has sprung, babies are being born, and so too are these Easter wood crafts.
If you’re stuck for a décor scheme for your Easter celebrations this year, read along and discover some fresh inspiration. I’ve compiled a list of twenty Easter wood crafts that I think deserves some notice, so let’s dive in.
1. Salvaged Wood Rustic Sign
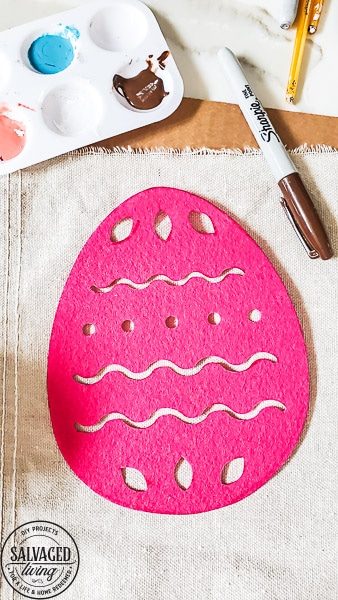

Credit: salvagedliving.com
First on the list is a super simple craft requiring not very much woodcutting but a whole lot of creativity. This is ideal if you have an old piece of wood hanging around your home, just waiting to be used!
If not, it’s super easy to head to your local junk or lumber yard and pick up a piece of reclaimed timber. Once you’ve oiled it with some wood oil (here), adorn your wood with some drop-cloth eggs you made yourself.
2. Porch Bunny Fence
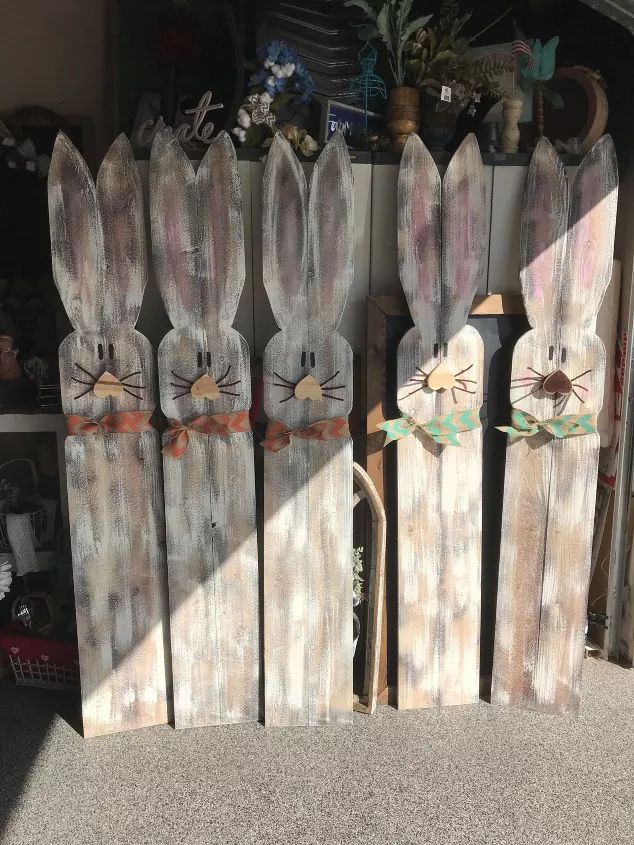

Credit: hometalk.com
Nothing says ‘welcome to my home’ like a collection of bunnies waiting to greet your guests at the front door. If you’re a fan of farmhouse décor, this iteration of porch décor will have you rushing to the lumber yard.
Creating the bunny shapes is super simple, requiring some easy cuts with a jig or miter saw. To speed the process along, try clamping the boards together with some G-clamps and cutting them both.
3. Faux Wood Easter Signs
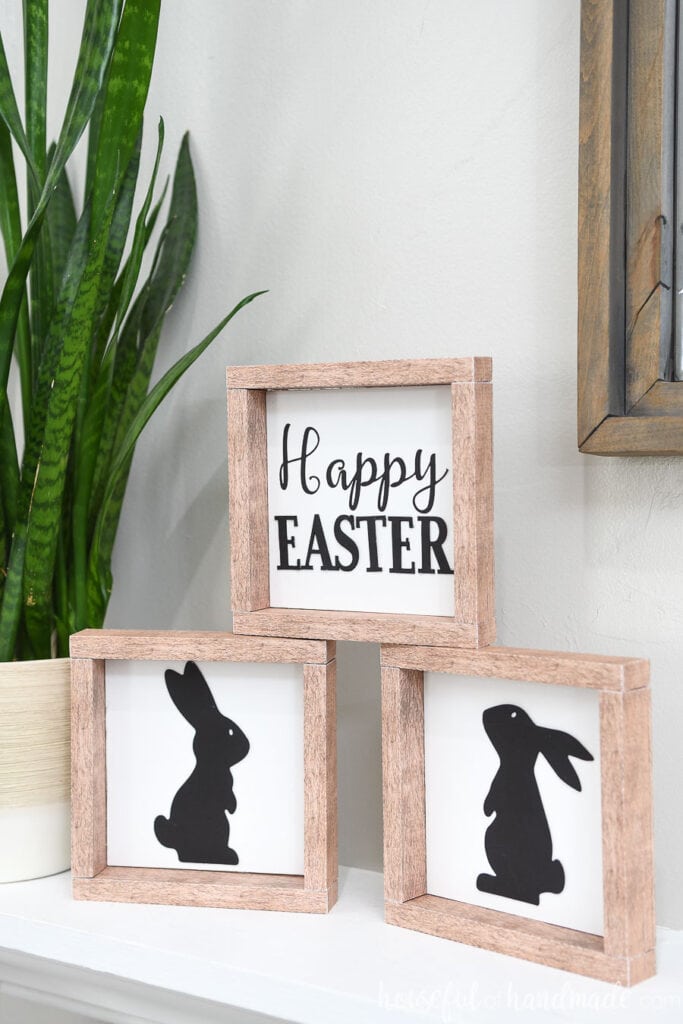

Credit: housefulofhandmade.com
This one might be cheating a little, but it’s so cute I can’t leave it off the list. These faux wood Easter signs require no power tools because they’re made entirely out of paper. What? That was wood once!
The key to this craft is a wood grain-patterned cardstock and a bone fold, which you can find here and here. Just plop down in front of your favorite show and fold these signs into submission.
The cool thing is you don’t have to relegate these to the Easter holidays. These faux wood signs are beautiful all year round, and you can repeatedly replace the message in the middle with ease.
4. Pallet Wood Spring Bunny Sign

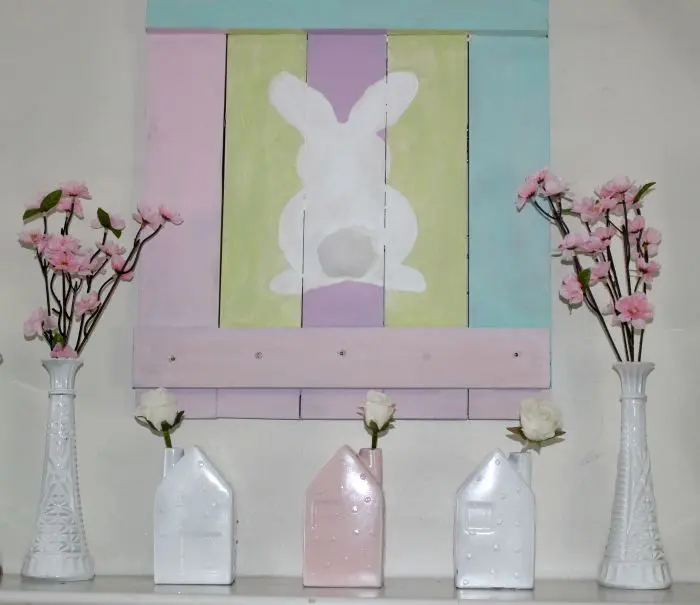
Credit: ourcraftymom.com
Next up, let’s upcycle a pallet board into something worthy of adorning our walls this Easter. Using pastel colors and a bunny’s silhouette, you too can have your very own rustic wall hanging.
Creating a pallet on your own is super simple, requiring only a hammer, some nails, and about seven 2×4 planks (depending on the size of your desired sign). An acrylic paint set like this will work just fine for wood.
To make sure the paint soaks into your wood, I recommend going over it lightly with high-grit sandpaper before you start painting. This removes any stray fragments and creates a lovely smooth surface to paint.
5. DIY Wood Carrots
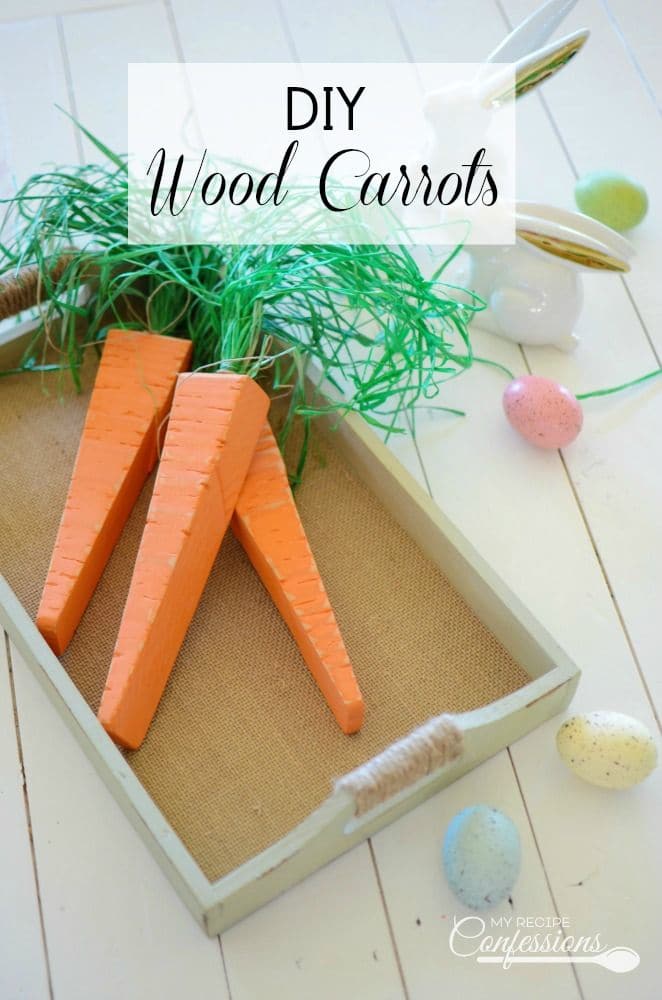
Credit: myrecipeconfessions.com
This is an adorable and versatile craft destined to adorn pretty much every corner of your home. These wood carrots are great whether you’re burying them in the yard or hanging them in bunches.
If you’re not an accomplished woodworker, this is a perfect project to start with. Requiring only a miter or jigsaw (here) and some careful diagonal cuts, you can get your bearings in a new craft discipline.
6. Reclaimed Wood Easter Bunny

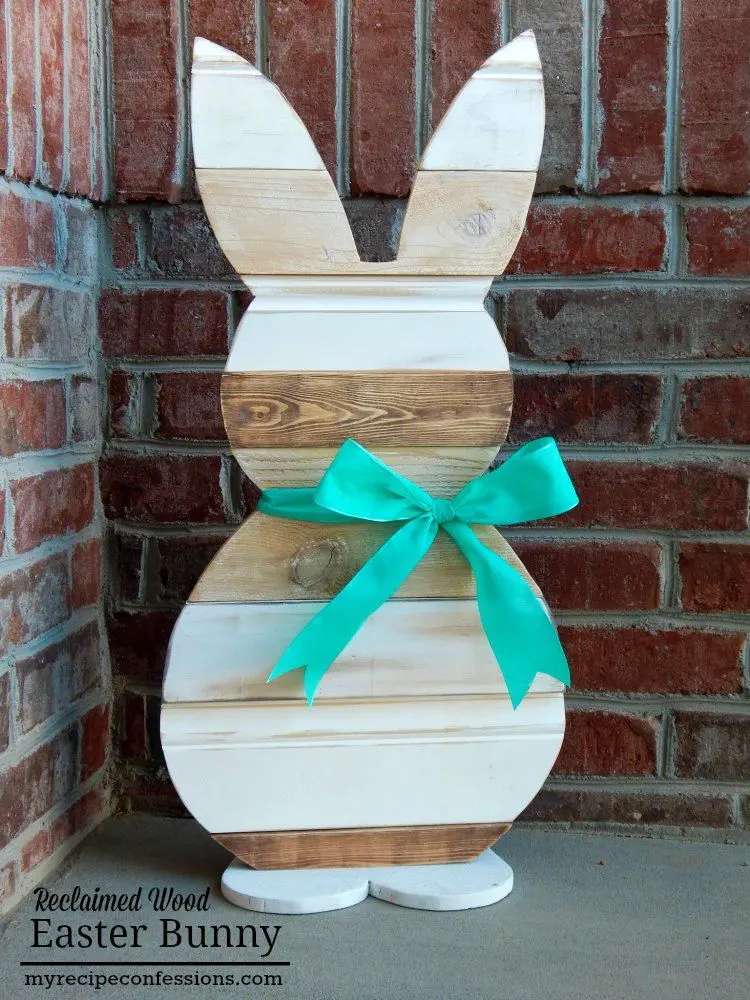
Credit: myrecipeconfessions.com
Place him on your porch, in your backyard, or have him guarding the corner of your living room. No matter where you place this sweet wood bunny, he’ll liven up your home with adorable Easter festivity.
To create a shape like this with reclaimed wood planks, you’ll be gluing the planks to a previously-cut bunny silhouette and trimming off the excess. Therefore, I recommend investing in strong wood glue (here).
7. Farmhouse Easter Blogs

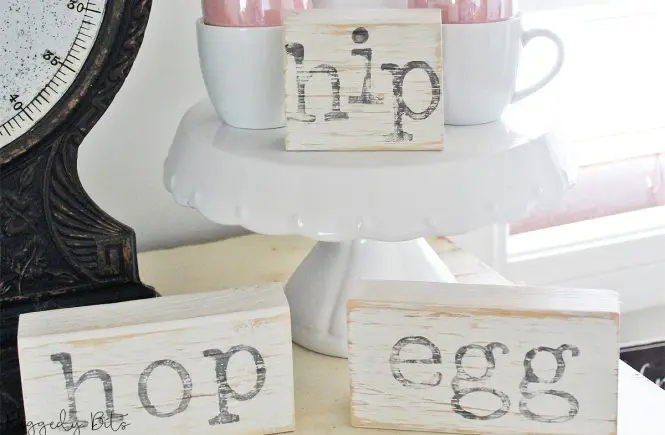
Credit: raggedy-bits.com
Next on the list is a super versatile technique that can be used at any time of the year. The only difference is which words you choose to adorn your wooden blocks with. I love the distressed white look!
This is a great technique to use if you have any reclaimed wood lying around. Especially if that’s been waiting for a purpose. If you don’t have decor stamps (here), you can also use another method for the words.
Simply print out the words in your chosen font on a piece of paper. Then, with a craft knife, carefully carve the letters out, leaving an exact stencil. Use a pencil to trace the stencil onto your wood, then paint over!
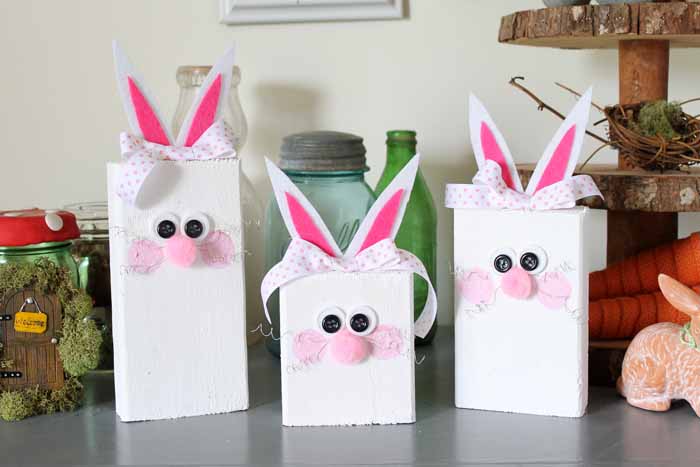
8. Chunky Bunnies Square Figurines
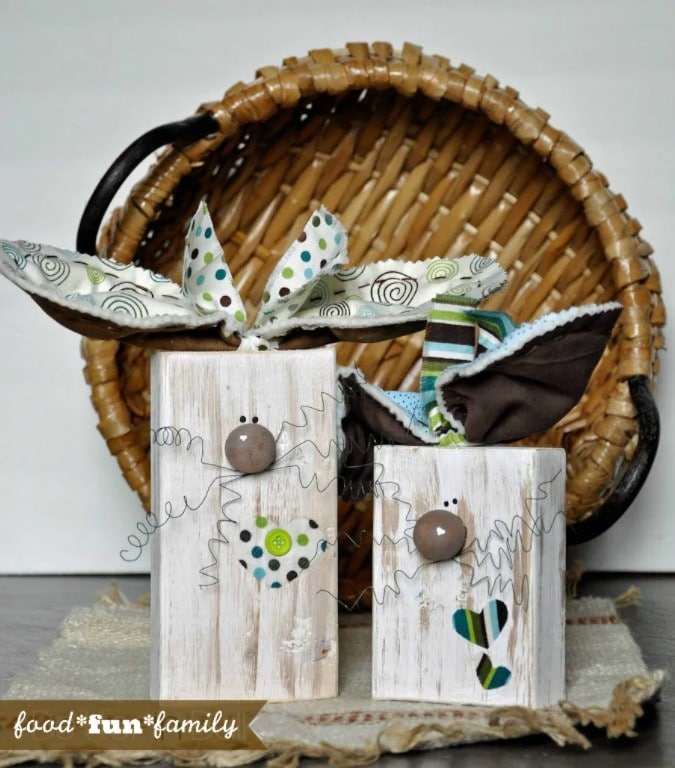
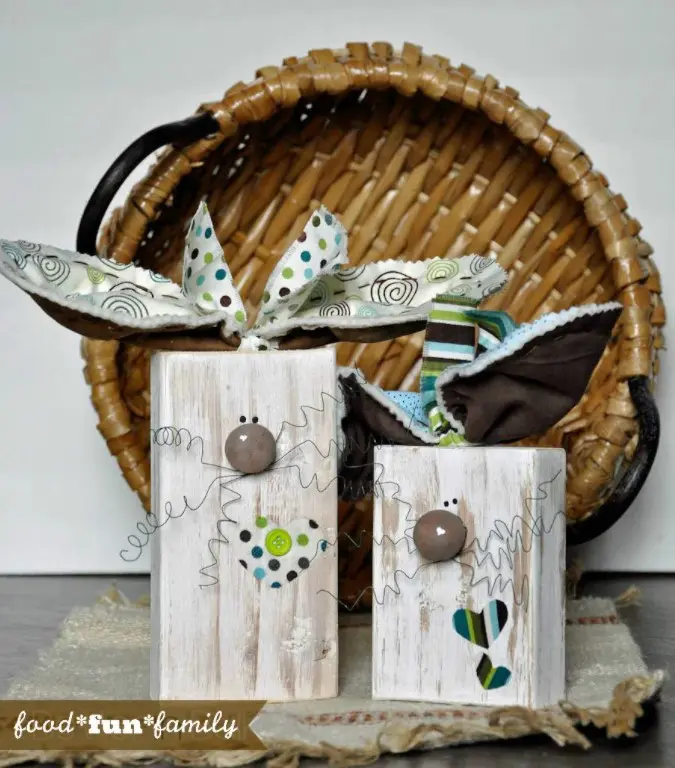
Credit: foodfunfamily.com
I love projects that take an abstract stance on something familiar, and these chunky bunny figurines do precisely that. Rather than creating the bunny silhouette, you simply decorate a block of wood to resemble one.
There are two elements to this craft: the whiskered nose and the fabric ears. For the nose, all you’ll need are some wooden balls like this and some wire. The fabric ears are hand-sewn by you, then glued on.
Quick and straightforward, this adorable craft yields a lot of joy and can easily be used year after year.
9. Reclaimed Wood Easter Eggs
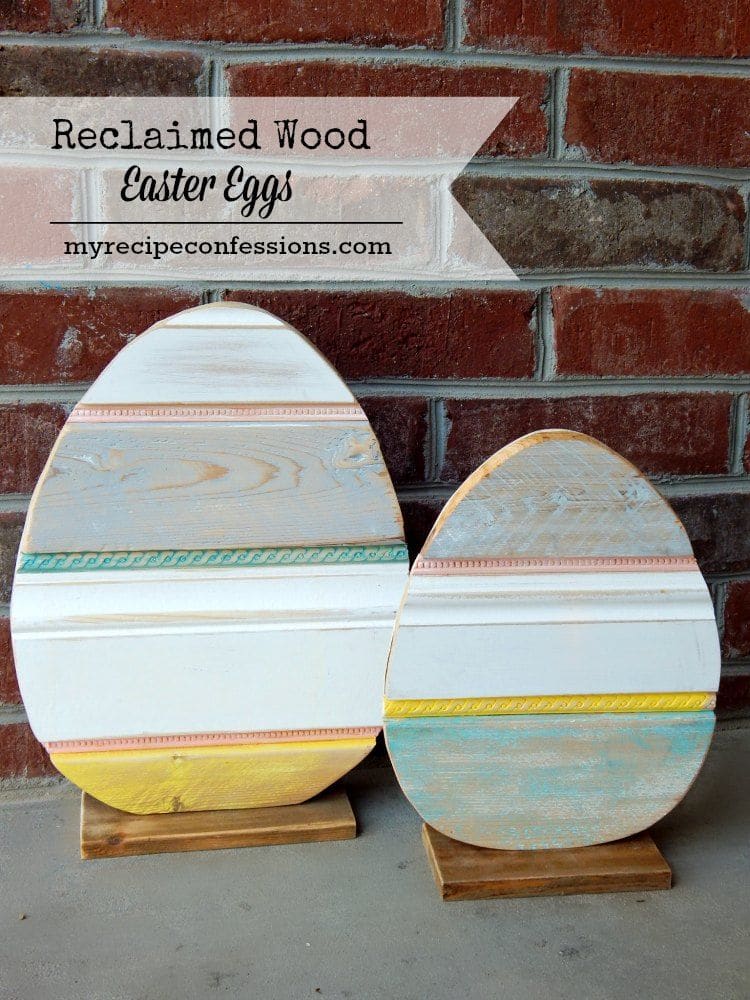

Credit: myrecipeconfessions.com
Remember the reclaimed wood Easter bunny from earlier in this list? Well, this Easter egg shape is a lot easier to make, so it might be a worthwhile introduction if number eight seemed too challenging.
This time, you’re painting the reclaimed wood with some adorable pastel acrylics to add a whimsical touch. I highly recommend creating two of these beauties for your porch, but they’d fit anywhere in your home!
10. Handmade Wooden Bunnies on Marble

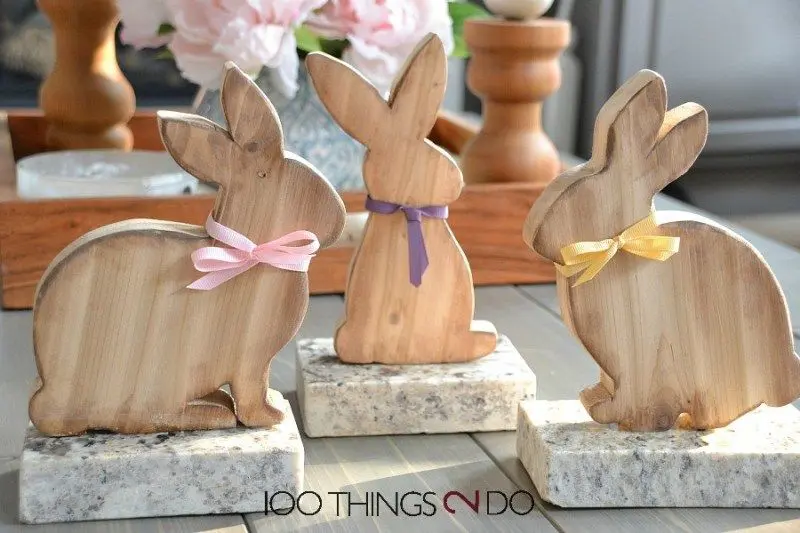
Credit: 100things2do.ca
Sometimes, the best craft ideas come from plagiarism. That’s right, guys, head down to your local homewares store and browse around; you’ll definitely find something to make for yourself.
In this case, this clever crafter spotted a wooden bunny figurine costing way too much, so she decided to take matters into her own hands.
With some marble slabs (here), a jigsaw, and some cheap wood, she created her own wooden bunny figurines for much less than the store’s asking price for just one. That’s the power of DIY!
11. Easter Bunnies from Scrap Wood

Credit: thecountrychiccottage.net
Here’s another take on the scrap wood bunnies from earlier in the list. However, this time, they’re pretty in pink! Add some fluff and texture to your delightful bunnies with pink pom-poms like these.
I think these are perfect for any room in the house. If you have kids, sit down and customize them to sit in their rooms, using pom-poms and ears in their favorite colors. What a fun and easy way to celebrate!
12. DIY Negative Space Wooden Sign

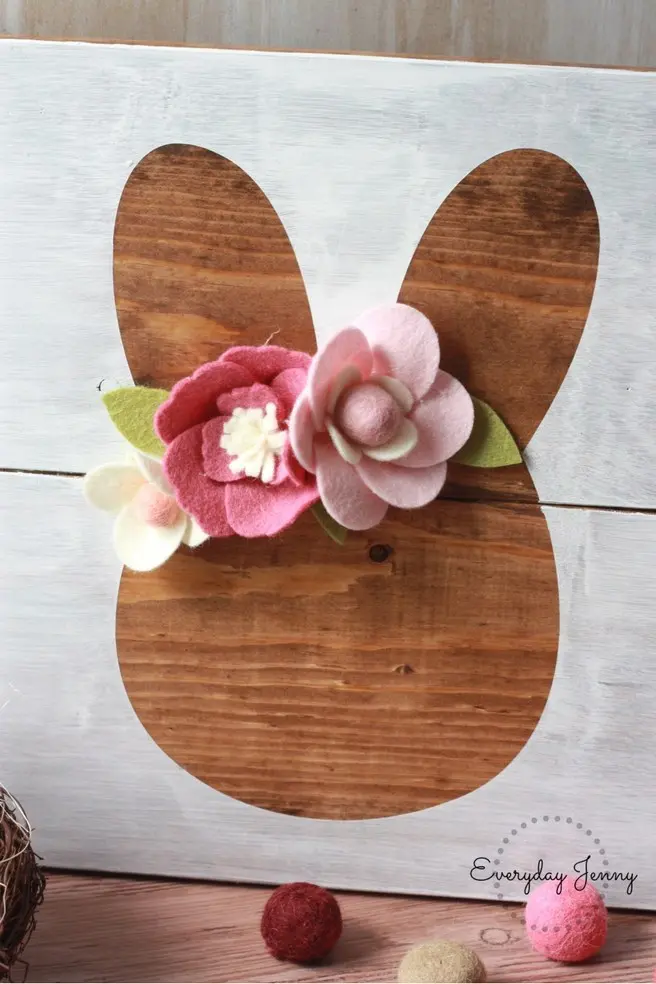
Credit: everydayjenny.com
Signs seem to be the order of the day on this list, but that’s just because they’re so easy to make and deliver so much value. Next up is this genius negative space sign, using a bunny head as inspiration.
While the result looks very professional, the process of making this is actually very simple. After you’ve created a simple wooden base, paint every except your bunny head to create a silhouette shape.
Now comes the fun part. It’s time to create your own custom flower headband for our little bunny friend using felt fabric. You can buy these pre-made here, but I think it’s fun to sit down and do it yourself.
13. Negative Space Bunny Family
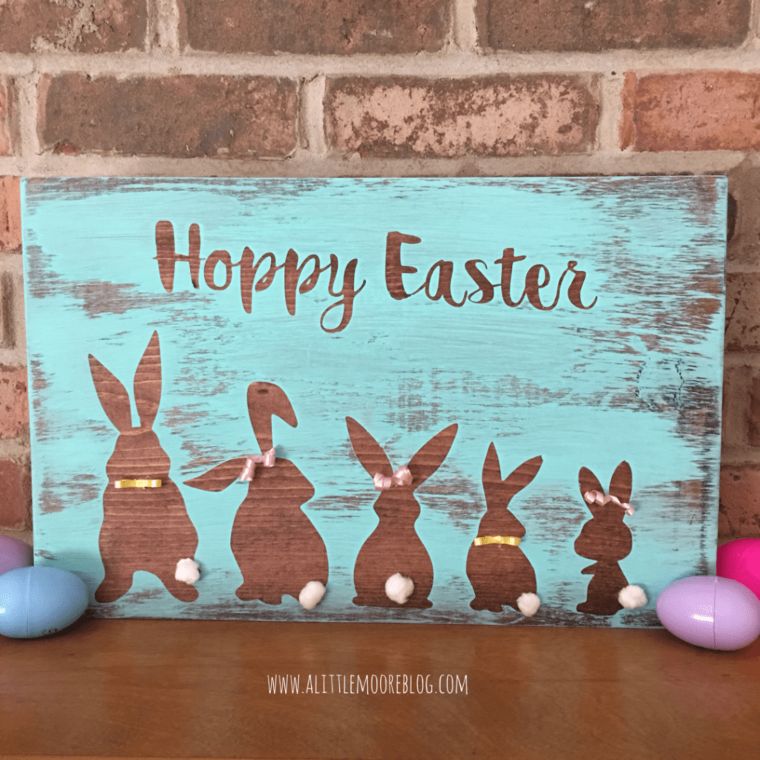

Credit: alittlemooreblog.com
Speaking of the negative space technique, this next DIY uses this to adorable effect. Mirror your family in a bunny form with an astonishingly cute distressed ‘Hoppy Easter’ sign, complete with little bows.
The key to getting this distressed or aged look is elementary. Paint your sign using chalk paint (I like this one), then go at it gently with high-grit sandpaper (here). This should wear away some parts, creating that coveted farmhouse aesthetic.
If you love this aesthetic for Easter, I’m pretty sure you’ll love it for Christmas too. Check out some noteworthy projects from this range of farmhouse Christmas décor.
14. Wood Slice Easter Ornaments
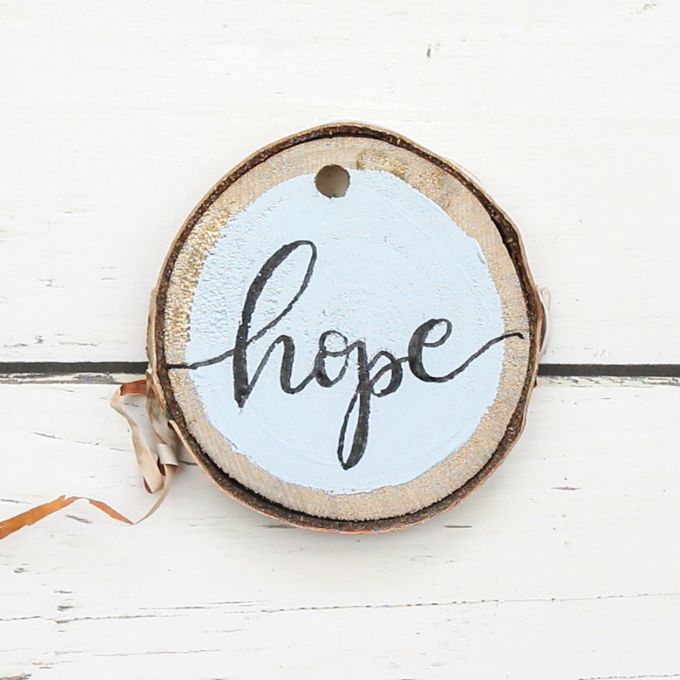
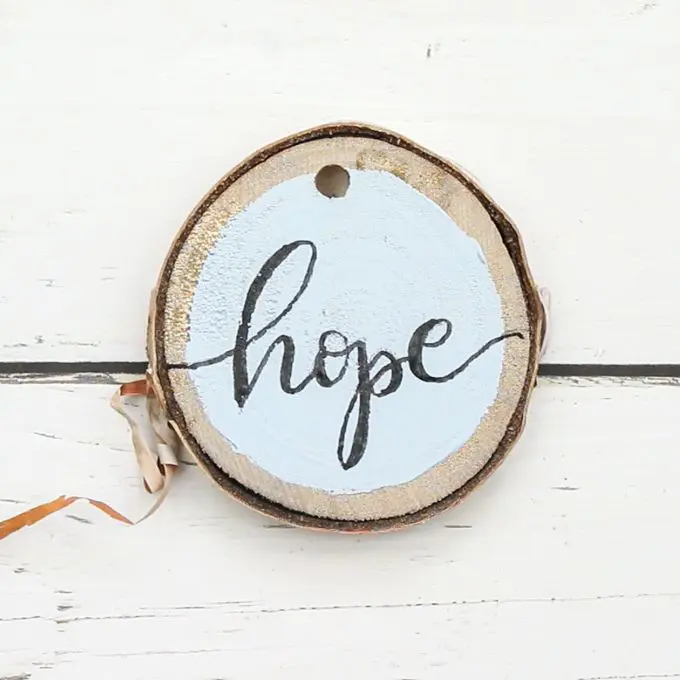
Credit: bethbryan.com
Now, I’m calling these Easter ornaments because you can choose a pastel color palette that suits this delightful spring holiday. However, this same technique can be used to create decorations for any time of year.
This craft is as simple as painting some pre-drilled wooden slices (find them here) with a word that really resonates with you. Words like ‘joy, ‘love,’ ‘hope,’ and of course, ‘chocolate’ really illustrate life’s cornerstones.
15. Carrot Pallet Sign


Credit: ribbonsandglue.com
Next up, a quick, simple, and kid-friendly woodcraft that’s perfect for propping up next to your front door. This wooden pallet sign is ideal for using up that last wood scrap, and there’s no wood cutting involved.
The carrot itself is created using cardstock, then affixed to the board with some wood glue. Finally, wrap some thick jute twine (this) around the board to emphasize that really rustic appearance. I’m in love!
16. Ombre Easter Wood Board
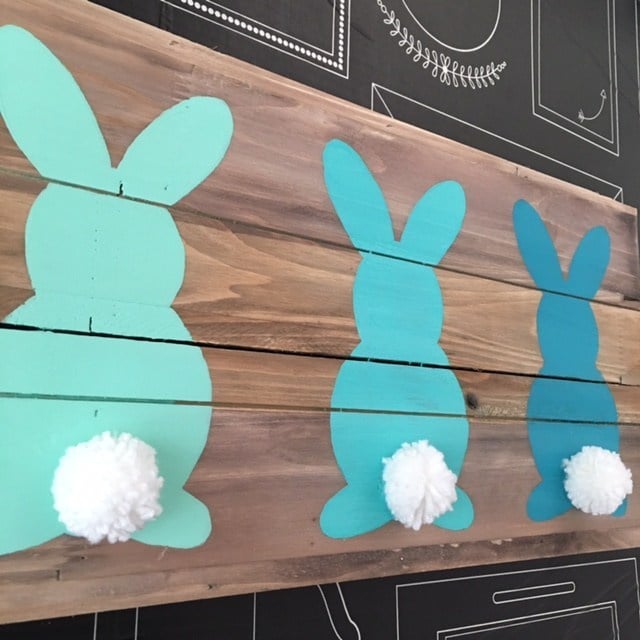

Credit: craftwarehouse.com
This next craft is ideal for anyone in the middle of a renovation because it requires a few long wood planks. Are you replacing your fence, re-boarding your home, or building a treehouse? This one’s for you.
I love the ombre effect on this sign. It creates so much interest while remaining in a minimal design space. Not to mention, those pom-pom tails are a perfect little addition. Make your own with this pom-pom maker.
17. Rustic Wooden Log Bunny
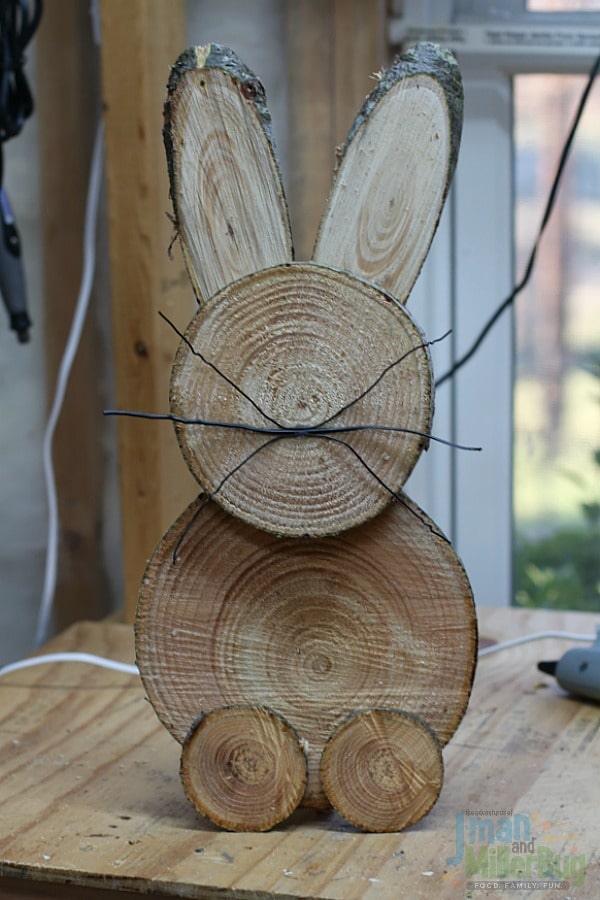

Credit: momunleashed.com
How can we talk about Easter décor without mentioning garden figurines? This simple log figurine is made almost like a snowman, using strategically overlapped circles to bring the bunny to life.
If you’re cutting down any trees in your backyard, this is a great way to use the wood remnants. If not, you can pick up log slices in different shapes here or by visiting your local crafts store.
To make sure your wooden bunny can endure the elements, consider spraying him with a clear enamel-like this to keep the wood pristine.
18. Create an Easter Bunny Tree Home
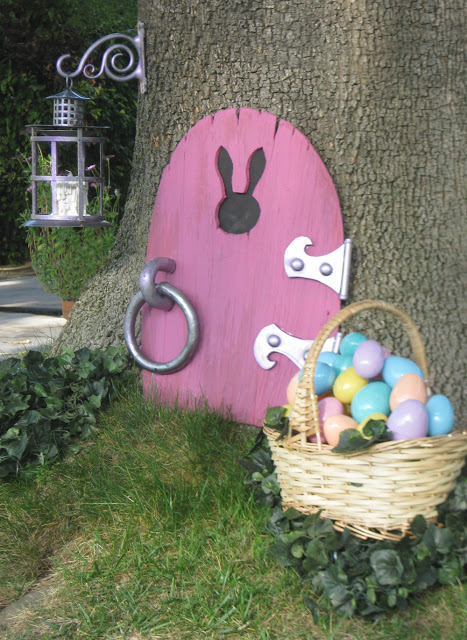

Credit: blogspot.com
Your garden is where the kids hunt for Easter eggs and – as far as they know – where the Easter bunny lives. I’m obsessed with this project because it not only brings that tale to life, but it’s also so dang cute.
This arched doorway is easy to cut out with a jig, including the hollow bunny head shape at the top (which you can fill with black mesh). You can find fake wooden door fixings and paint them silver with this.
Alternately, pick up some genuine metal door fixings at your local junkyard to make the entrance seem as authentic as possible. I guarantee your kids will fall in love with on-sight.
19. Rustic Storage Crates
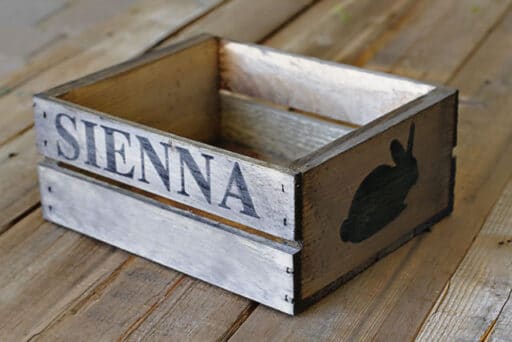

Credit: lilblueboo.com
Whether you’re using them for egg hunts or you actually need some Easter-themed storage in your life, these rustic crates are the answer. Quick and easy to whip together, this is excellent introductory woodcraft.
I highly recommend making one of these for your kids and using them as hunting baskets on Easter morning. They’re reusable as bedroom storage, which makes them very sustainable!
20. Distressed Wooden Egg Garland
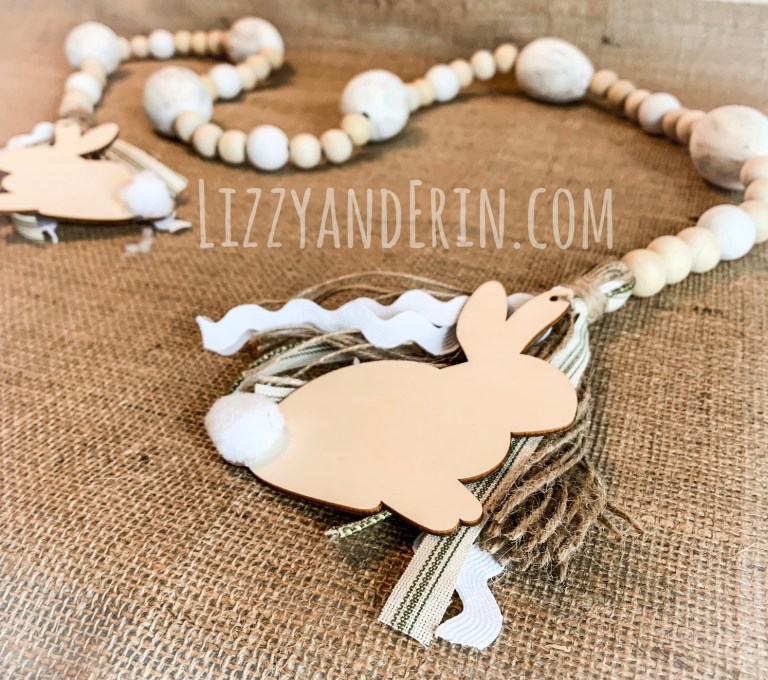

Credit: lizzyanderin.com
Finally, our last craft celebrates Easter using one of the most traditional decorations of all time: a garland. After buying pre-made colored wooden eggs like these, your only job is to distress and string them!
So, cover them in white chalk paint and sand down with high-grit sandpaper. The color will begin to peek through, so once they’re strung up, you’ll have a subtle yet beautiful Easter decoration to bring spring indoors.
Conclusion
Which one is your favorite? Let me know in the comments how you’re decorating for Easter this year!